Introduction
You built your store on Zoho Commerce, products are live, and orders are starting to come in. The next question is always the same: how do you get those orders shipped without manually entering each customer's address into a courier website?
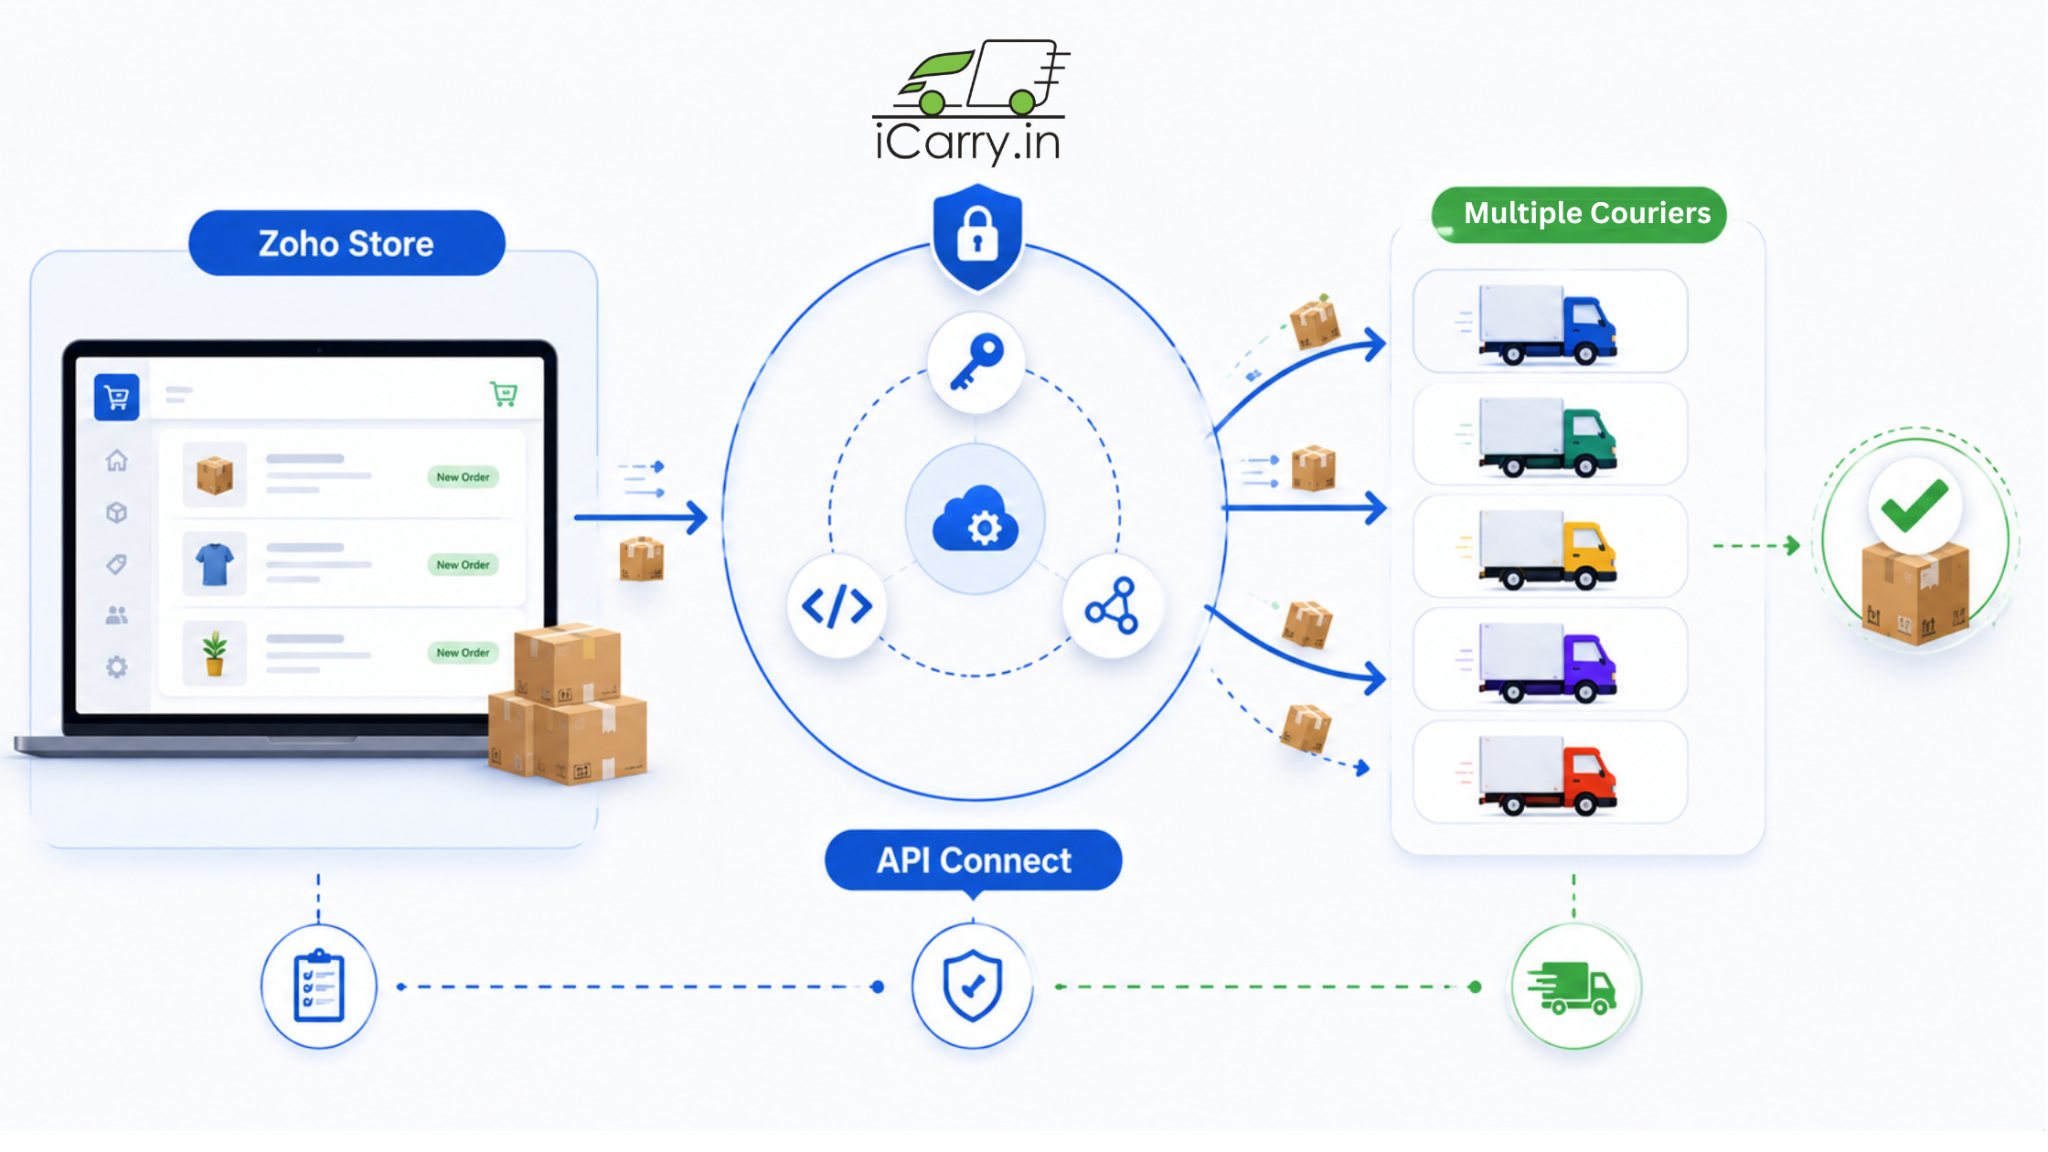
iCarry® is a courier aggregator that gives Zoho Commerce sellers access to multiple courier partners from a single dashboard if connected using API integration. This means you are not locked into one courier - you compare rates and route each order to the best available option for that pincode.
What Is the iCarry® - Zoho Commerce Integration?
The iCarry®-Zoho Commerce integration is an API connection that automatically syncs orders from your Zoho Commerce store into the iCarry® dashboard - so you can book shipments, compare courier rates, and update fulfilment status without manually entering any order data. Once connected, new Zoho orders appear in iCarry® within 15 minutes of placement, and tracking updates sync back to Zoho automatically after booking.
This guide walks you through the complete Zoho integration setup - step by step - using the exact process from iCarry®'s official video tutorial.
What You Will Need From Zoho
You will generate these credentials from your Zoho developer account. You can refer to the official Zoho API Console documentation for understanding how API authentication and access tokens work.
The Zoho integration requires four credentials that you collect from two places:
- Organization ID: From your Zoho panel under Developer Space > APIs > API Details
- Client ID: Generated at api-console.zoho.com
- Client Secret: Generated alongside your Client ID
- Authorization Code: Generated in the Generate Code tab - time-limited, complete setup within 10 minutes
Important: The Authorization Code expires quickly. Have all your other fields filled in iCarry® before you generate it, so you can paste and save immediately.
Step-by-Step: How to Connect Zoho Commerce to iCarry®
Step 1: Open the Zoho Connector in iCarry®
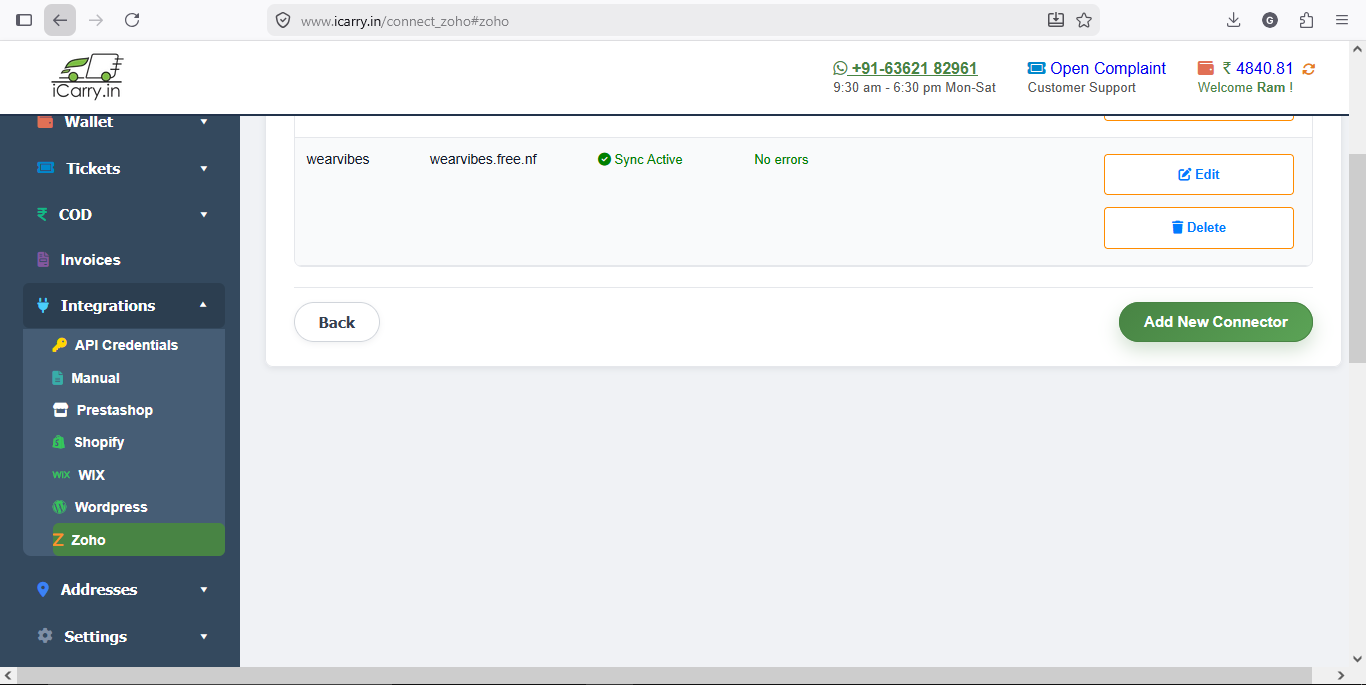
- Log in to your iCarry.in account
- From the left-side menu, go to Integrations and click on Zoho
- Click on Add New Connector
- You will see all the required fields. Scroll down on the same page - iCarry® provides detailed step-by-step instructions under 'How can I get my Zoho Credentials?' which you can refer to at any time during setup
Step 2: Get Your Organization ID From Zoho
Zoho panel
- From the left-side menu, go to Developer Space > APIs > API Details
- Here you will find your Organization ID
- Copy the Organization ID and paste it into the Organization ID field in iCarry®
Step 3: Generate Client ID and Client Secret
- Select Self Client and click Create Now
- You will now see your Client ID and Client Secret on screen
- Copy both values and paste them into the respective Client ID and Client Secret fields in iCarry®
Step 4: Generate the Authorization Code
- In the Zoho API Console, go to the Generate Code tab
- For the Scope field: Enter "ZohoCommerce.salesorders.READ,
ZohoCommerce.salesorders.CREATE, "ZohoCommerce.salesorders.UPDATE, ZohoCommerce.shipmentorders.CREATE, ZohoCommerce.shipmentorders.UPDATE - Set the Time Duration to the maximum available - usually 10 minutes. You must complete the setup within this window
- In the Description field, enter: Read and Write permission on Orders and Shipment Orders
- Click Create
- Your Authorization Code will be generated on screen
- Copy this code immediately and paste it into the Authorization Code field in iCarry®
Step 5: Enter Store Details and Save
- Enter your Store Name - this is your brand name
- Enter your Store URL - your website domain only (e.g. yourstore.com, without https:// or trailing slashes)
- Click Save
- If all details are correct, you will see a success message confirming the connection
That's it. Your Zoho Commerce store is now successfully connected to iCarry.in.
Watch this video to understand how the iCarry-Zoho integration works and how to set it up step by step.
What Happens After the Integration is Live
For sellers running multiple sales channels, keeping order data synced between storefronts, inventory systems, and shipping platforms becomes increasingly important as volumes grow. Platforms like Shopify Help Center also highlight the importance of connected apps and automated workflows for managing growing commerce operations.
Orders Sync Automatically
After setup, your Zoho orders will automatically appear in iCarry® within 15 minutes of placement. No manual export or file upload required.
Find your synced orders under My Shipments in the Unassigned section. For a full walkthrough of the My Shipments dashboard... watch Overview of My Account > My Shipments on iCarry's YouTube channel.
Book Individually or in Bulk
For a single order, click the Actions button to compare courier rates, select the best option, and book. For multiple orders, select them using the checkboxes and click Bulk Book Shipment to process the entire batch in one action. To see how courier selection and rate comparison works before confirming a booking, watch How to Book Shipment by Selecting Preferred Courier on iCarry's YouTube channel.
Fulfilment Syncs Back to Zoho
Once a shipment is booked in iCarry®, the tracking number and fulfilment status sync back to your Zoho order automatically. Your customer receives their tracking update without any manual action from your side.
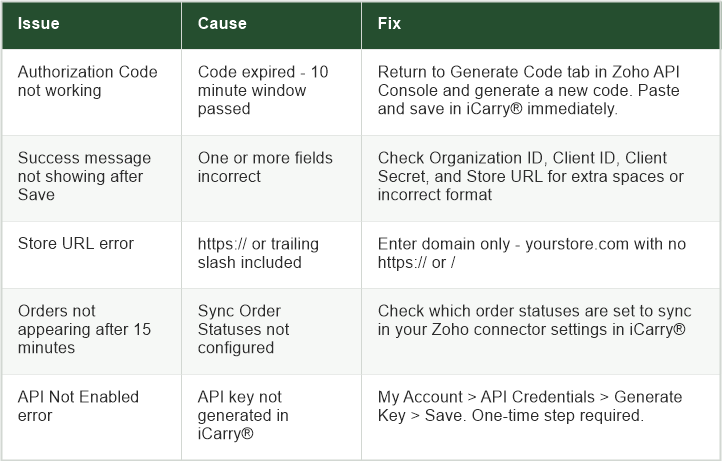
Troubleshooting Common Setup Issues
What You Can Do After Connecting Zoho Commerce to iCarry®
Once your Zoho store is connected, you get access to everything iCarry® offers for every order - not just basic shipping:
- Multiple courier partners: Compare live rates across Delhivery, Blue Dart, Xpressbees, Ekart, Amazon Shipping, Shadowfax and more before every booking
- Free daily COD remittance: Automatic T+7 settlement every business day at zero cost for all plans
- Delivery Boost: Trained agents call customers on your behalf to reduce fake NDRs and improve delivery success
- WhatsApp Engagement: Two-way delivery notifications from iCarry's official number (+91-63621-82961) at every shipment milestone
- Weight discrepancy disputes: Dedicated dashboard to review and dispute incorrect billing within the 5-day window
- Free Bronze plan: No monthly fee, no minimum shipment volume. Rates start as low as ₹21* per 500g
For Zoho sellers who want to understand how to get the most out of multi-courier access, multi-courier allocation explains how routing each order to the best available courier for that specific pincode reduces both cost and RTO.
Final Thoughts
The Zoho Commerce integration with iCarry® is a one-time setup that removes repetitive manual work from your daily shipping process. Orders stop requiring manual handling. Courier booking happens from one place. Tracking updates without requiring manual tracking updates.
The 10-minute time limit on the Authorization Code is the only part that is the step where most users face issues during setup. Have all your other fields ready in iCarry® before generating the code in Zoho - then paste and save within the window. If you miss it, simply generate a new code and try again.
For Zoho sellers who want to further reduce shipping costs and reduce RTO after connecting the integration, iCarry®'s Delivery Boost and WhatsApp Engagement features are available from the same dashboard immediately after setup.
Register free at iCarry.in and connect your Zoho store today. No monthly fee. No minimum shipments.
Frequently Asked Questions (FAQs)
How do I integrate Zoho Commerce with iCarry.in?
Log in to iCarry® > Integrations > Zoho > Add New Connector. You will need your Zoho Organization ID, Client ID, Client Secret, and an Authorization Code generated at api-console.zoho.com. Full step-by-step instructions are also available on the same iCarry® page.
Where do I find my Zoho Organization ID?
Log in to your Zoho panel. Go to Developer Space > APIs > API Details. Your Organization ID is listed there. Copy and paste it into the Organization ID field in iCarry®.
Where do I get the Client ID and Client Secret for Zoho?
Go to api-console.zoho.com. Select Self Client and click Create Now. Your Client ID and Client Secret are displayed on screen. Copy both and paste them into the respective fields in iCarry®.
The Authorization Code expired before I could save - what do I do?
Go back to the Generate Code tab in the Zoho API Console, copy the scope from iCarry's page, set duration to 10 minutes, and generate a new Authorization Code. Paste it immediately into iCarry® and click Save. Have all other fields filled in before generating the code.
How long does it take for Zoho orders to appear in iCarry®?
After a successful integration setup, your Zoho orders will appear in iCarry® under My Shipments - Unassigned within 15 minutes of order placement.
Does iCarry® charge extra for the Zoho integration?
No. The Zoho connector is included at no extra charge for all iCarry® account holders. You only pay per shipment when you book - no integration fee, no monthly plan required on the free Bronze tier.
Can I use multiple couriers after connecting my Zoho store to iCarry®?
Yes. iCarry® gives access to multiple courier partners from one platform. For each Zoho order synced to iCarry®, you compare live rates and choose the best available courier for that specific pincode and weight before confirming the booking.
Can I connect multiple Zoho Commerce stores to one iCarry account?
Yes, sellers managing multiple Zoho Commerce stores can connect them separately using individual connectors from the iCarry® dashboard.
Does Zoho Commerce integration automatically create shipping labels?
Once orders sync to iCarry®, you can book shipments, select a courier, generate shipping labels, and sync tracking details back to Zoho Commerce without manually entering shipment information.
The iCarry®-Zoho Commerce integration is a one-time API setup that automatically syncs Zoho orders into iCarry®, enables multi-courier rate comparison and booking, and syncs tracking details back to Zoho - eliminating manual data entry from your daily shipping process. The Authorization Code has a 10-minute window; have all other fields ready before generating it.