Two packing stations, side by side. Station A: tape dispenser on the left, scale to the right of the table, label printer on a separate trolley 2 metres away, boxes in three sizes stacked on the floor. The packer lifts, reaches, walks. Average packing time per order: 4 minutes 20 seconds.
Station B: tape dispenser directly above the work surface within arm's reach, scale on the table surface at packer's right hand, label printer at the table's edge in front, boxes in three sizes on a shelf at shoulder height above the table. Average packing time per order: 2 minutes 45 seconds.
Same packer, same products, same courier. Station B takes 37% less time per order. At 200 daily orders, that saves more than 5 hours of packing labour per day.
The packing station is the operational core of any Indian business that ships physical products. For businesses dispatching 50 to 2,000 orders daily, the layout, equipment, and organisation of the dispatch station determines packing speed, error rate, and scalability. A poorly designed station is a daily tax on every order dispatched. A well-designed one is a compounding productivity advantage.
Here is how to design and set up a packing station that is fast, accurate, and scalable.
What Is a Packing Station?
A packing station is a dedicated workspace where orders are packed, sealed, weighed and labelled before courier pickup. A good one keeps the scale, label printer, tape, boxes and packing materials within arm's reach, so the packer never has to walk or bend. For most Indian sellers, that means a table of at least 120 x 80 cm with four set zones.
How to Check Your Packing Station Is Set Up Right
- Is the weighing scale on the table surface at the packer's working hand?
- Is the label printer within arm's reach of the work surface - not on a separate trolley?
- Are all box sizes at or above waist height - never on the floor?
- Is tape immediately accessible above the work surface without reaching across the table?
- Is the SOP (Standard Operating Procedure) posted at eye level at the station?
- Are consumables (tape, bubble wrap, void fill) stocked for at least 2 days without restocking?
The Four Zones of an Efficient Packing Station
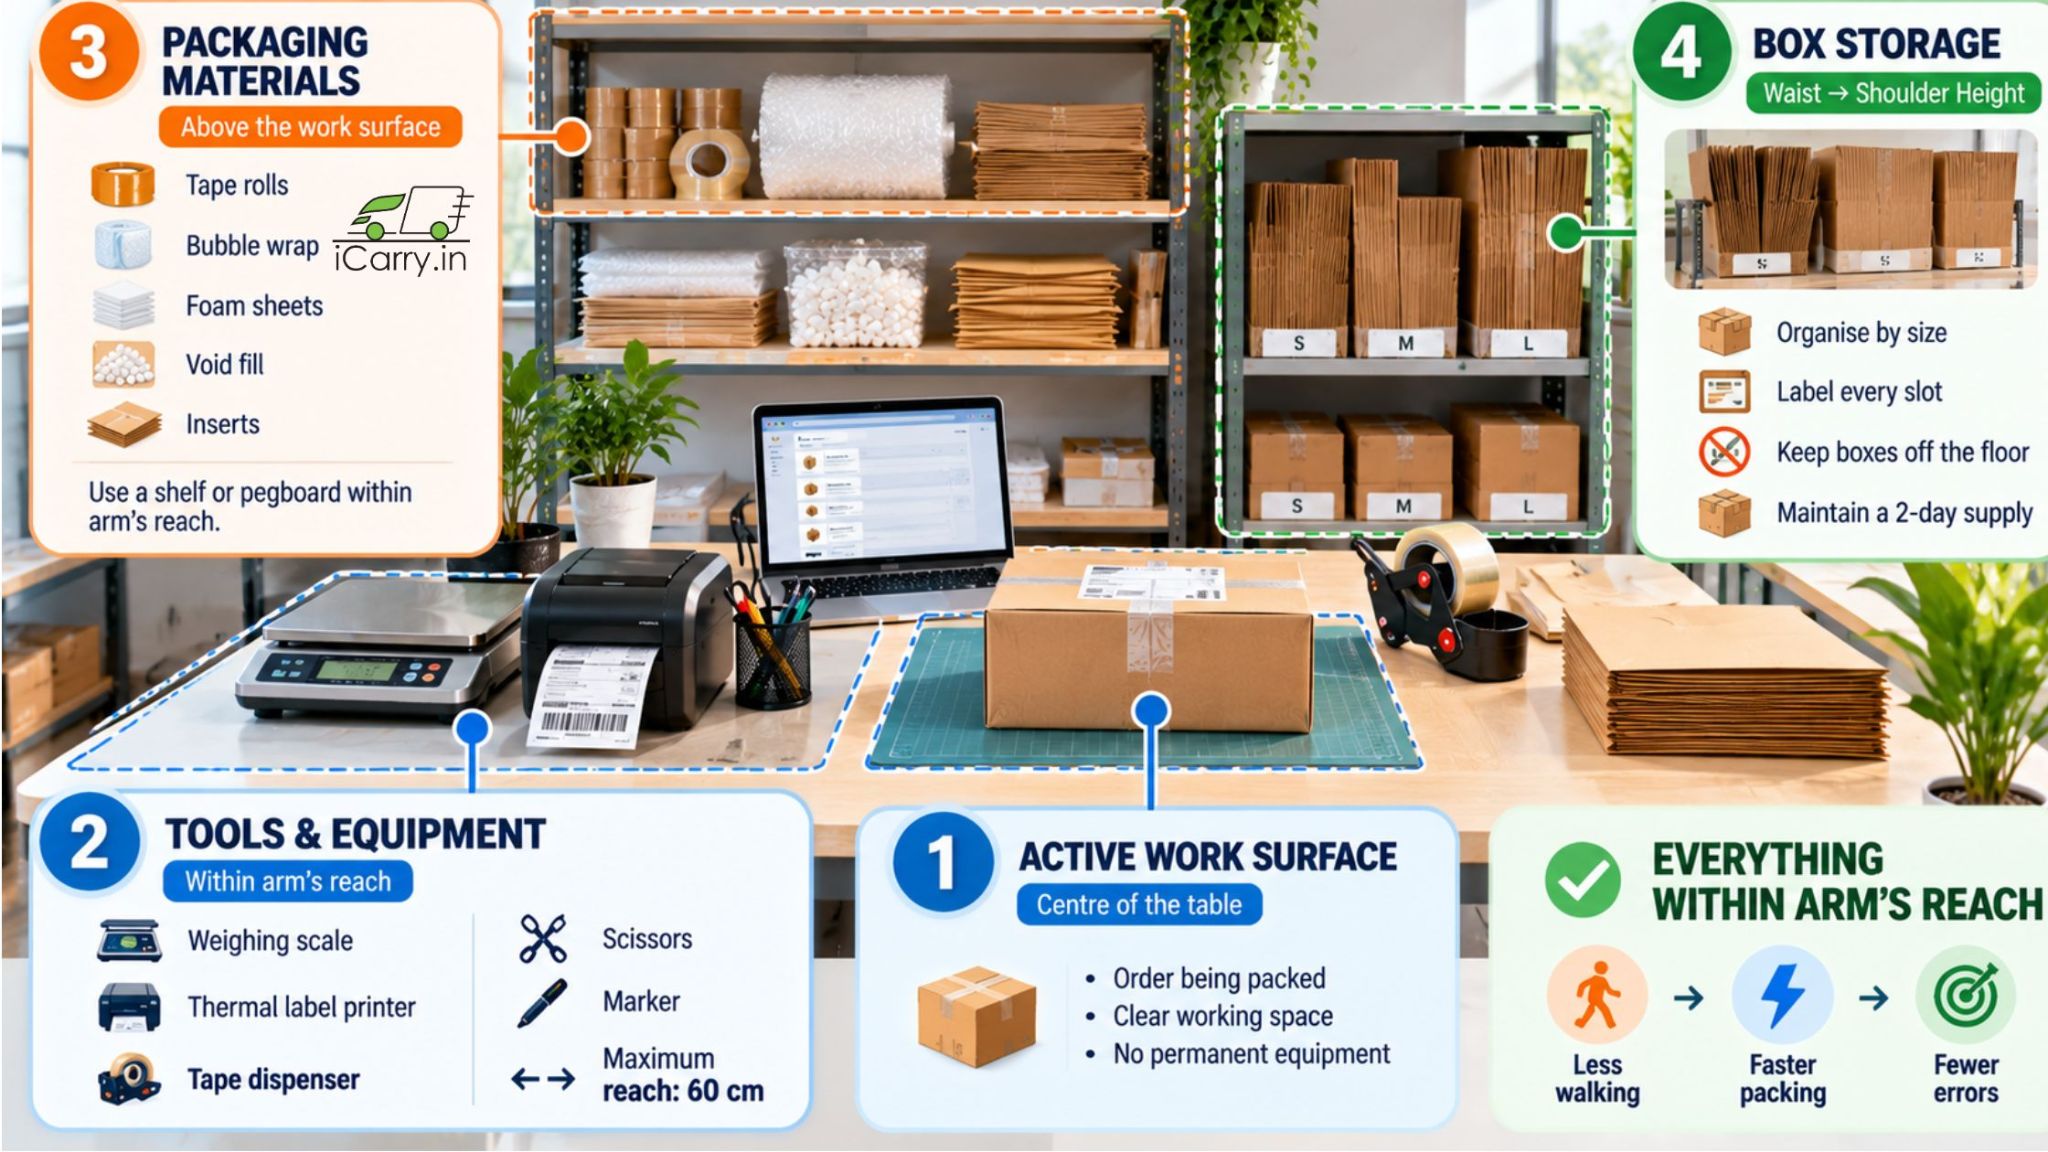
Every packing station should be organised into four distinct zones, each with a specific function:
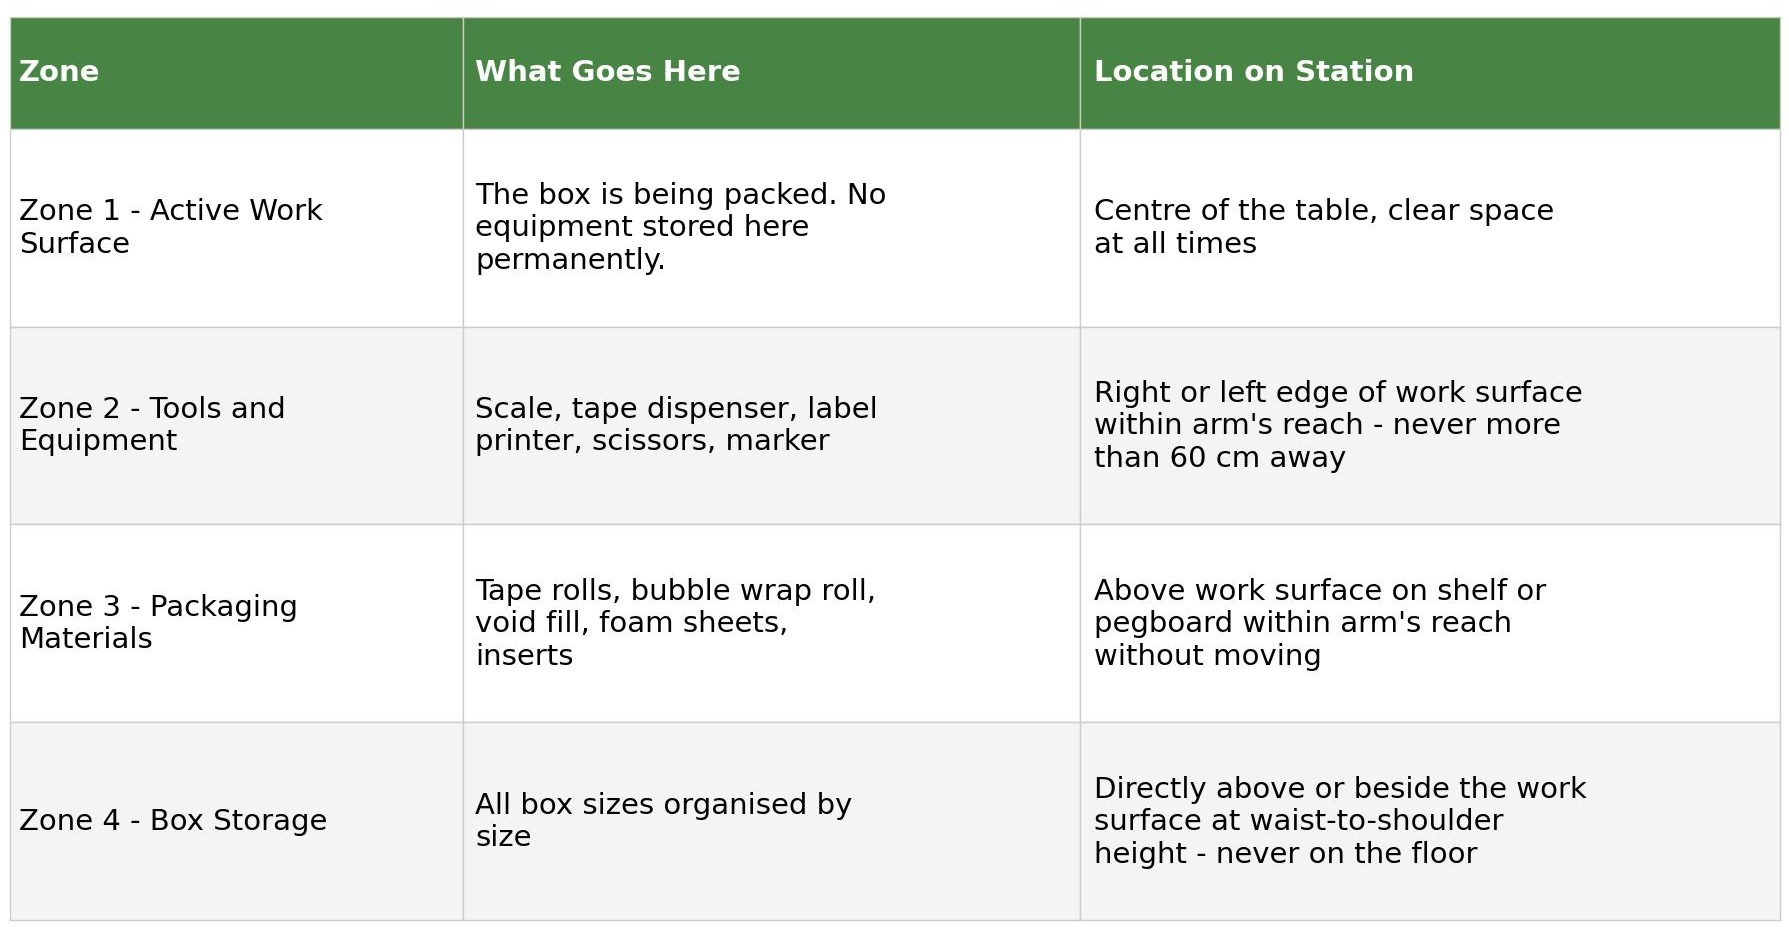
The principle: the packer should never have to walk, bend below knee height, or reach more than arm's length to access any item used in the packing process. Every movement that requires the packer to leave the work surface is wasted time multiplied by every order packed.
Equipment List - What Every Packing Station Needs
Non-Negotiable Equipment
- Weighing scale: Legal-for-trade certified scale accurate to 10g. Minimum 30 kg capacity. Must be on the work surface, not on the floor. Calibrate monthly with a known weight. Zero before every session. Digital display facing the packer at reading distance
- Label printer: Thermal label printer (4-inch or 6-inch). No ink cartridges to replace. Label rolls are the only consumable. Zebra, Honeywell, or equivalent - thermal printers rated for 200+ labels per hour. Connect to your shipping platform's computer directly
- Tape dispenser: Heavy-duty desktop tape dispenser with brake - mounted at the edge of the work surface above the active packing area. Not handheld. Handheld tape dispensers are 3x slower for high-volume packing. Keep minimum 2 spare rolls under the dispenser
- Work table: Minimum 120 x 80 cm surface. Ideal height 85 to 95 cm for standing operation. Standing operation is significantly faster than seated for box packing - packers can move weight around the table without twisting
- Computer or tablet: For order management system access, label printing, and shipment booking. A dedicated device per station prevents shared-device bottlenecks. Mount the screen at eye level - not flat on the table
Standard Equipment
- Box cutter / knife: One per station, blade safety-covered when not in use. For opening incoming supplier deliveries and adjusting box sizes when needed
- Permanent marker: For writing weight on the box before booking and for any manual markings (FRAGILE, KEEP UPRIGHT, box numbers)
- Scissors: For cutting bubble wrap, foam sheet, and tape manually. One pair per station, kept in the tools zone
- Ruler or measuring tape: For verifying box dimensions when calculating volumetric weight on new SKU packaging
- Rubber bands or cable ties: For bundling multiple small items within a box
Box Storage and Organisation
The Box Size Matrix
Box selection is the single most common cause of packing inefficiency. A packer who has to think about which box to use for each order takes 3 to 5 times longer per box decision than one following a posted reference chart.
Post a laminated box selection reference at every station. The chart should show each box size by SKU or product category - the packer selects the box based on the chart, not intuition:
- SKU A: use Box Size 2 (25 x 20 x 10 cm)
- SKU B: use Box Size 1 (15 x 12 x 8 cm)
- SKU C + D bundle: use Box Size 3 (30 x 25 x 15 cm)
- SKU E (fragile): use Box Size 2 with foam insert from Shelf 3B
This chart takes 30 minutes to create when you set up the station. It saves 10 to 30 seconds per order for the lifetime of the station.
Right-sized boxes also cut volumetric weight charges. See how courier charges are calculated in India before you finalise your box sizes.
Physical Box Storage
- All box sizes stored at waist-to-shoulder height - never on the floor. Bending to pick up a box from the floor costs 3 to 5 seconds per box and creates back strain over a full dispatch day
- Boxes stored flat (knocked down) in size-labelled slots on shelving directly behind or beside the work surface
- Minimum stock: 2-day supply of every box size. Reorder trigger posted: 'When Slot 2A falls below [X] boxes, raise a reorder'
- For businesses with 3+ box sizes: label each shelf slot with the box dimensions (e.g. '30x25x15 cm - Box Size 3'). Labelling prevents wrong box selection by new team members
Packaging Materials Organisation
Storage Position
- All packaging materials (tape, bubble wrap, foam sheet, void fill, poly mailers) stored on a shelf or pegboard directly above the work surface
- The packer should be able to pull bubble wrap, tear it, and return it to the roll without moving from the work position
- For bubble wrap rolls: mount a horizontal rod above the work surface that the roll hangs from. Pull-and-tear without lifting the roll
- For foam sheet: store in a flat tray on the shelf above the work surface, pre-cut to standard sizes if your products require consistent wrapping dimensions
- For void fill (paper, crumpled kraft): keep in a box with an open top at the edge of the work surface. Reach in and pull without lifting the box
Consumable Stock Levels
Running out of tape in the middle of a dispatch session stops production. Set minimum stock levels and assign restocking responsibility:
- Tape: minimum 3 rolls on the station at all times. Reorder when 1 roll remains
- Bubble wrap: minimum one full roll on the rod. Next roll in storage within the packing area
- Label stock: minimum 500 labels (one roll) on the printer. Reorder when the roll is half empty
- Box stock: minimum 2-day supply in each size. Reorder at the trigger point posted above each slot
Label Printing Setup
Label printing is the final step before a parcel is ready for pickup. It should be the fastest step, not a bottleneck:
- Print all labels in one batch: After all orders for the session are booked on the shipping platform, print all labels in one batch. Do not print one label, apply it, book the next order, print, apply. Batch printing is 3 to 4x faster
- Printer directly at the work surface: The label comes out of the printer and goes directly onto the box. No walking to a shared printer, no label tray that needs emptying
- Label application before weighing or after? Apply after sealing and weighing. A label applied before the final seal is at risk from tape accidentally covering it during sealing
- Label quality check: After printing, briefly verify the AWB number on the label matches the booking. One mislabelled order out of 200 is a wrong-delivery that generates a return and a complaint. The 3-second check is worth it
Print labels and manifest from your shipping platform before pickup. How to Print Shipment Label and Manifest covers the process in iCarry®
A wrong weight at booking can trigger an extra charge after pickup. Reduce weight discrepancy by weighing sealed parcels on the station scale, then compare courier rates on iCarry® before every booking.
Scaling from One Station to Multiple
When order volume grows past 150 to 200 daily orders, a single station becomes a bottleneck. The right time to add a second station is before the first one starts causing delays in courier pickup:
- Mirror the setup: Every additional station should be identical to the first - same equipment positions, same box storage layout, same material organisation. A team member who works at Station A should be able to move to Station B without any adjustment
- Shared equipment exceptions: Large-format label printers (8-inch rolls) can be shared between 2 stations if positioned centrally between them. Scales are always per station - sharing a scale creates a bottleneck
- Shared SOP: Post the same SOP at every station. Same font, same lamination. A team member who reads the SOP at Station A should find the same document at Station C
- Station numbering: Label each station (Station 1, Station 2, Station 3). Assign specific station responsibilities in the daily SOP - Station 1 handles marketplace orders, Station 2 handles D2C orders, Station 3 handles B2B. Clear ownership prevents work going undone
How iCarry® Integrates With Your Packing Station
iCarry® is a courier aggregator that integrates directly into your packing station workflow - from order booking to label printing to pickup management:
- Bulk booking: Book all session orders in one action from the computer at the packing station. No individual order-by-order booking that interrupts the packing flow
- Integrated label printing: iCarry® generates shipping labels in standard format compatible with all major thermal label printers. Print all labels in one batch after booking
- Manifest generation: Print the courier manifest alongside the labels. Overview of My Account > My Shipments shows the My Shipments dashboard where all active orders are monitored
- Weight discrepancy prevention: Entering accurate sealed parcel weight at booking (using the station scale after sealing) reduces weight discrepancy charges and disputes
- Multiple courier selection: Compare rates and select the optimal courier per order at booking time.
- Delivery Boost: Add Delivery Boost for shipments that need additional pre-delivery coordination, helping improve successful delivery attempts and reduce avoidable RTOs.
- Two-way WhatsApp Engagement: Coordinate with customers through two-way WhatsApp communication. Customers can confirm availability, update their address, or coordinate delivery, while businesses can view the conversation history.
- COD management: Manage COD shipments and settlements through the same account, with automatic T+7 settlement and Early COD options from T+0 for faster access to COD funds.
Free Bronze plan, no minimum volume.
Final Thoughts
A packing station is not furniture. It is a production system. The 37% time difference between Station A and Station B in the introduction is not driven by the skill of the packer - it is driven entirely by where the tools and materials are positioned relative to the work surface.
Design it correctly once. Post the box size chart. Mount the tape dispenser above the surface. Put the scale on the table. Position the label printer at arm's reach. Stock two days of consumables. Post the SOP at eye level. Then train every team member to the same standard before they pack a live order.
A well-designed packing station compounds its value every day - in faster dispatch, fewer errors, lower fatigue, and better scalability when order volume grows.
Frequently Asked Questions (FAQs)
What is the ideal size for a packing station work table?
Minimum 120 x 80 cm surface area. The table must accommodate the active packing area (centre), the tools zone (one side), and space for a sealed parcel awaiting labelling. Ideal height is 85 to 95 cm for standing operation. If the table is too low, packers bend and develop back strain. Too high, they raise their shoulders. Adjustable-height tables are ideal for operations running multiple shifts or with packers of different heights.
Should I use a thermal label printer or a standard inkjet/laser printer?
Thermal label printer, without exception. Thermal printers use heat to print directly on thermal label stock - no ink cartridges, no toner, no consumables except the label roll. They print a 4x6 inch shipping label in under 2 seconds, withstand warehouse conditions, and have a lower lifetime cost than inkjet or laser printers for high-volume label printing. Compatible with all major Indian courier aggregator platforms.
How do I store boxes efficiently at a packing station?
Store all box sizes on shelving at waist-to-shoulder height directly behind or beside the work surface. Never on the floor - bending to pick up boxes from floor level costs 3 to 5 seconds per box and causes back strain over a full dispatch day. Label each shelf slot with the box dimensions and post a box selection reference chart that matches SKUs to box sizes. Stock minimum 2 days' supply of each box size.
How many packing stations do I need?
One station can process 80 to 150 orders per 8-hour shift depending on product type and packing complexity. Simple soft goods (apparel, accessories): up to 150 orders per station per shift. Fragile or complex products requiring individual wrapping: 50 to 80 orders. When a single station begins causing delays in courier pickup timing, add a second identical station. Mirror the setup exactly so team members can move between stations without adjustment.
How does iCarry® integrate with the packing station?
iCarry® runs on any web browser on the computer at the packing station. After packing is complete, the team member books all session orders in bulk from the iCarry® dashboard, selects the courier, and prints all labels in one batch on the thermal label printer at the station. The manifest is also printed from iCarry® for the courier agent pickup. All shipments are then trackable from My Account > My Shipments from the iCarry® dashboard.
A fast packing station isn't about a faster packer - it's about geometry. Scale on the table, tape above the surface, label printer within reach, boxes at waist-to-shoulder height, and a posted box-size chart so no one has to think. Set the four zones up once, keep two days of consumables stocked, and mirror the layout exactly when you add a second station. That's the whole difference between 4 minutes 20 seconds and 2 minutes 45 seconds per order.