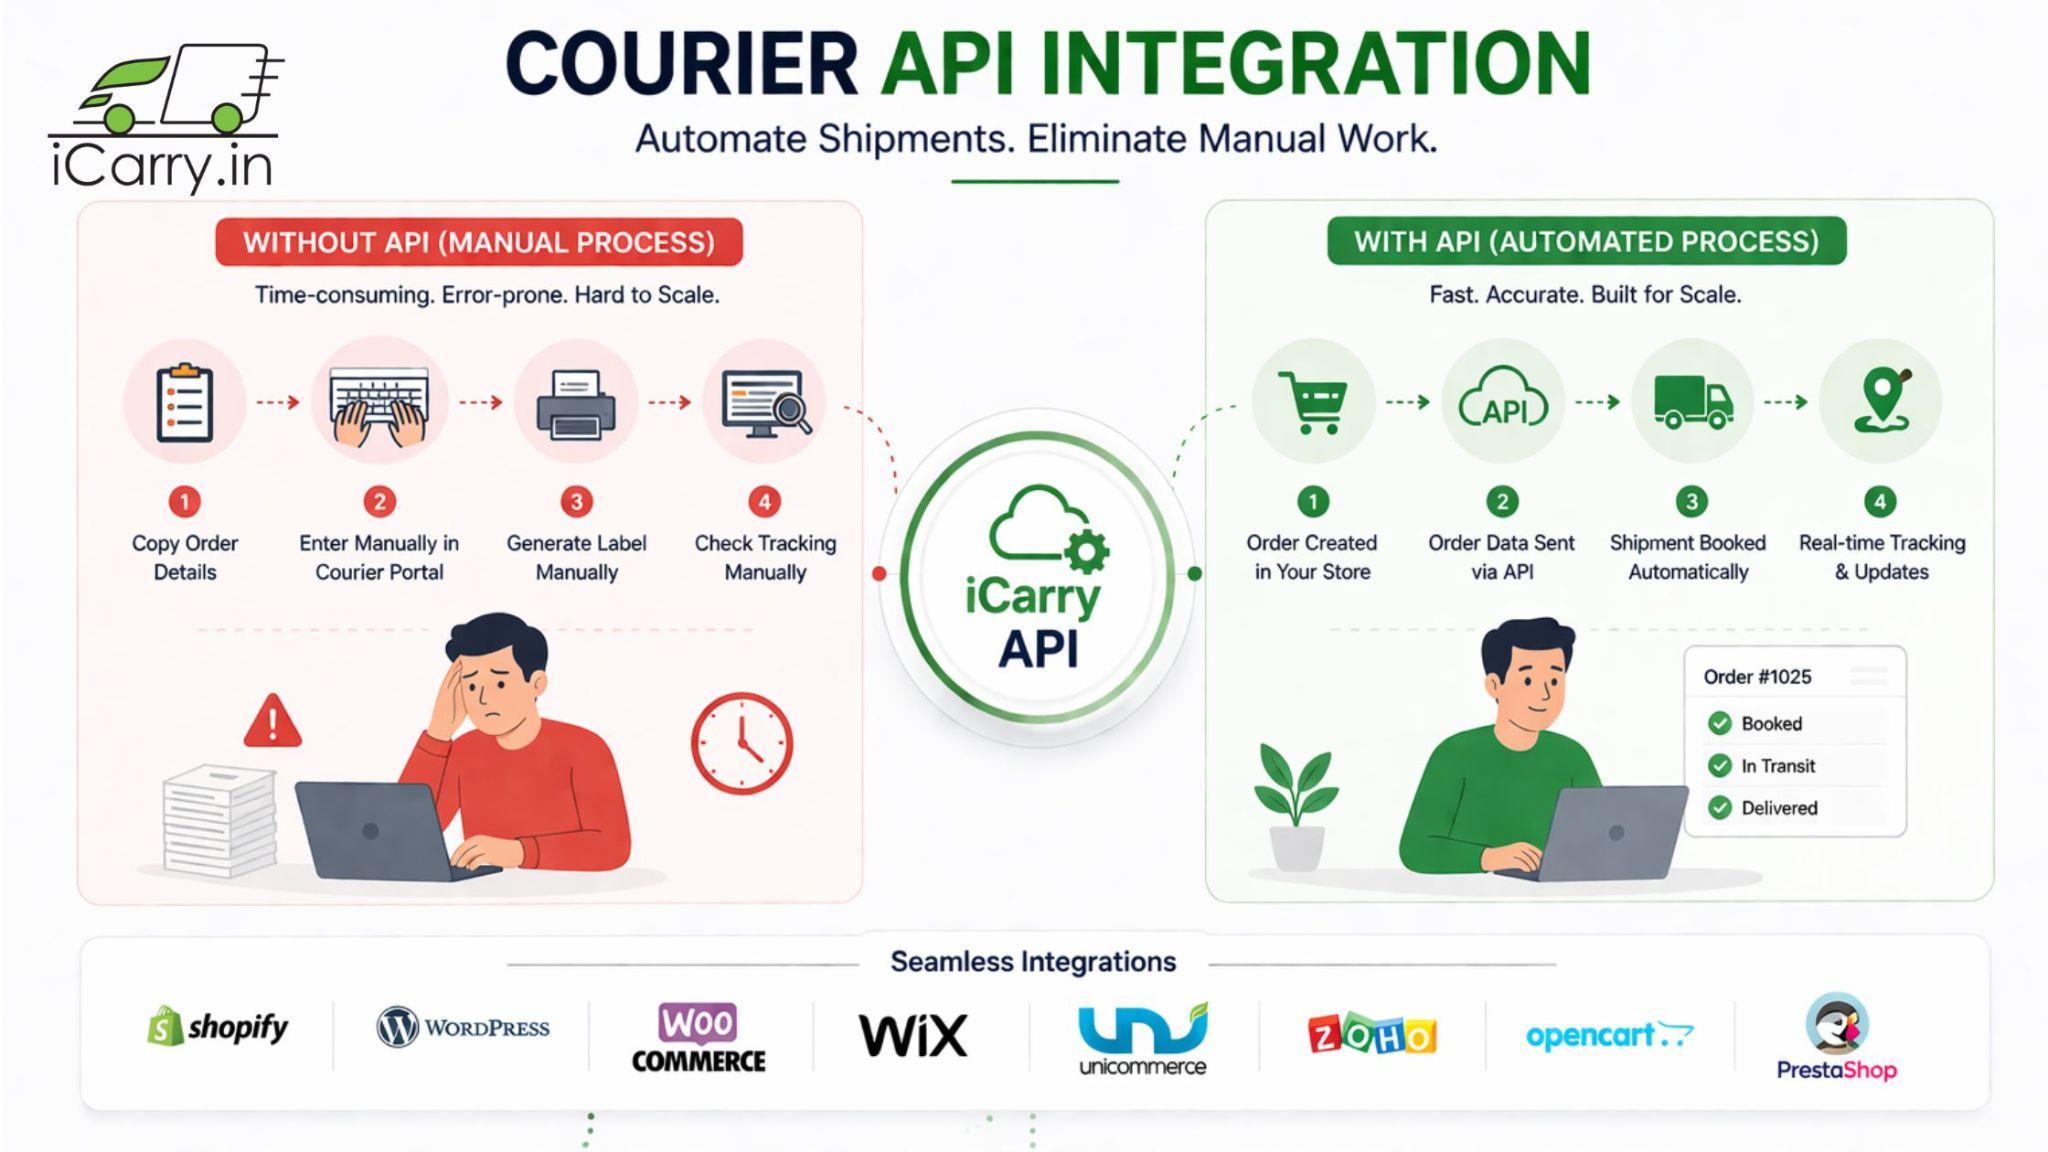
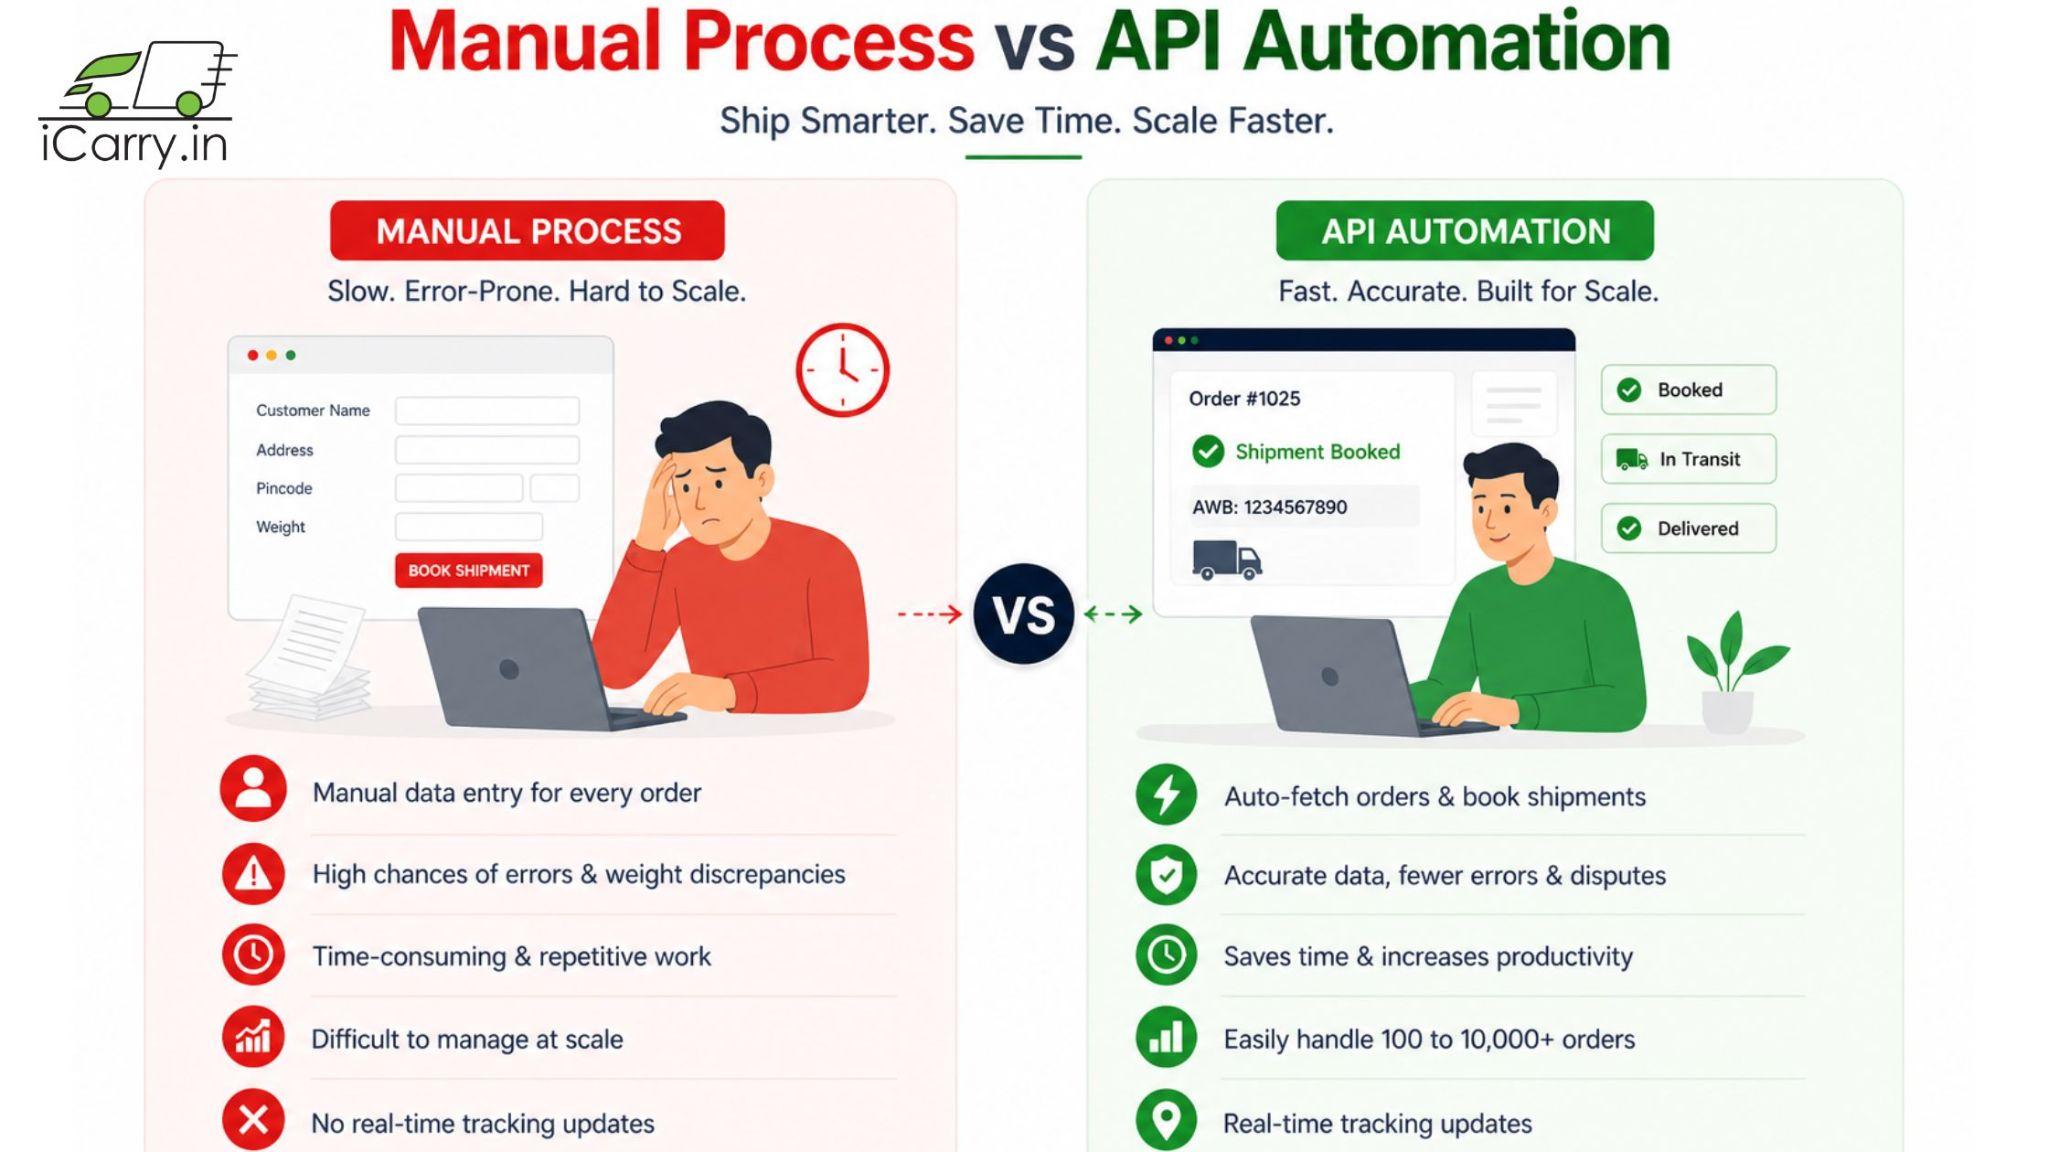
You are processing 200 orders a day. Your team opens the courier portal, copies the customer name, pastes the address, enters the weight, selects the courier, prints the label - and does this 200 times. Every day.
That is not a logistics operation. That is a data entry operation wearing a logistics costume.
Courier API integration solves this entirely. When your store, your OMS, or your custom system talks directly to a courier or courier aggregator through an API, shipments are booked automatically, labels are generated instantly, tracking updates flow back into your system in real time, and your team focuses on exceptions - not entry.
The guide on what a courier aggregator is and how it works provides the broader context for why aggregator APIs in particular have become the dominant integration approach for Indian eCommerce sellers - giving access to multiple courier networks through a single API rather than maintaining separate integrations for each courier.
This guide explains what courier API integration means in practice, how it works for Indian sellers, what the API covers, how to connect popular platforms like Shopify and WooCommerce without writing any code, and how to troubleshoot common issues. Courier API integration connects your store or OMS directly to courier systems so shipments can be booked, tracked, and managed automatically at one place.
Quick Checklist - Before You Integrate
Whether you are using a no-code connector or building a full API integration, confirm these 7 things first:
- Have you generated your API credentials? Go to My Account > API Credentials > Generate Key - this is a one-time step required before any API call will work
- Do you know your Store URL exactly as it appears in your browser - not your custom domain, but the platform URL (e.g. yourstore.myshopify.com)?
- Are your product weights and dimensions accurately recorded in your store? API booking passes these values to the courier - inaccurate entries create weight discrepancy charges
- Do you have the right API permissions enabled on your store? For Shopify this means Orders, Customers, and Fulfilments with read-write access
- Have you decided on automated vs manual courier selection? The platform supports both - auto-assign based on cost and serviceability, or choose courier per order
- Is your shipping wallet topped up before the first bulk booking? Shipments only process if sufficient balance is available
- Have you tested on a single order before running bulk? Always verify the integration with one test shipment before processing your full queue
What Is Courier API Integration?
Courier API integration is the process of connecting your eCommerce platform, order management system, or custom application to a courier or courier aggregator's system through an Application Programming Interface (API) - allowing shipments to be booked, tracked, cancelled, and managed programmatically without manual input.
In simple terms: instead of someone typing order details into a courier portal by hand, your system sends those details automatically to the courier's system, receives confirmation and tracking data back, and updates your records - all without human intervention.
For Indian eCommerce sellers, courier API integration typically means one of two things:
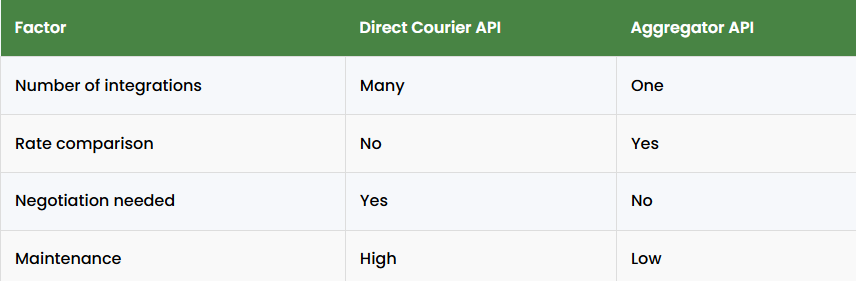
- Direct courier API: Integrating with a single courier like Delhivery, Xpressbees, or Blue Dart directly. Gives deep control but requires separate integration per courier and separate volume negotiations
- Courier aggregator API: Integrating with a platform like iCarry® that provides access to multiple courier partners through a single API. One integration, multiple couriers, pre-negotiated rates
Why Courier API Integration Matters for Indian eCommerce
Eliminates Manual Data Entry
At 50 orders per day, manual booking is slow but manageable. At 200 orders per day, it becomes a full-time job for two people. At 500 orders per day, it is operationally impossible without automation. API integration removes this bottleneck entirely.
Reduces Human Error
Manual entry of customer addresses, pincodes, and weights introduces errors that cause failed deliveries, weight discrepancy charges, and courier disputes. API-driven booking pulls data directly from the order source - the same data the customer entered - eliminating the transcription step where errors occur.
Enables Real-Time Tracking
API integration allows tracking status to flow back into your system automatically. Your team sees shipment status without logging into the courier portal. Your customer receives tracking updates without your team manually copying and pasting AWB numbers into emails.
Supports Scale
Automated shipment booking through an API scales linearly with order volume. Whether you process 100 or 10,000 orders, the integration handles them the same way. Shipping optimisation at scale becomes possible only when the booking workflow is removed from human hands.
Enables Intelligent Courier Allocation
An API integration that queries multiple couriers before booking - comparing rates, serviceability, and delivery time for each order - implements multi-courier allocation automatically. Each order is routed to the best available courier without any manual decision-making.
iCarry® API: What It Covers
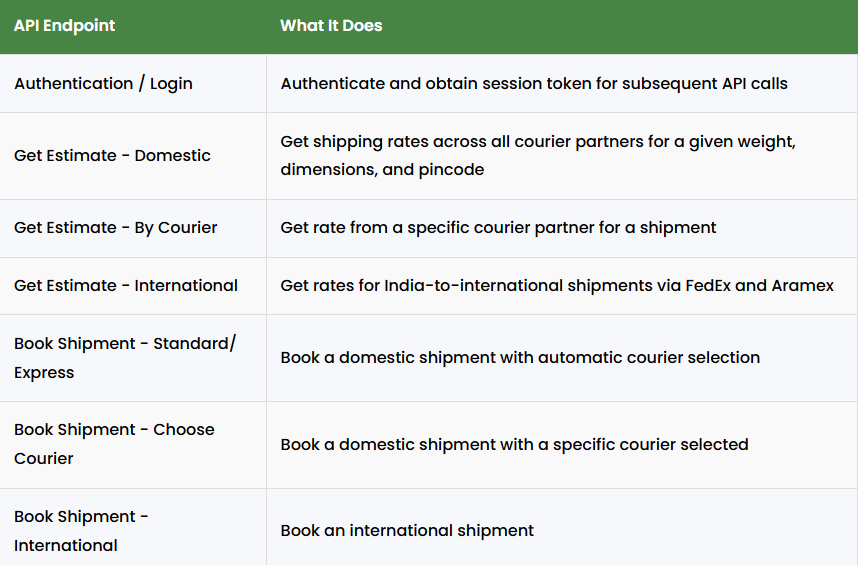
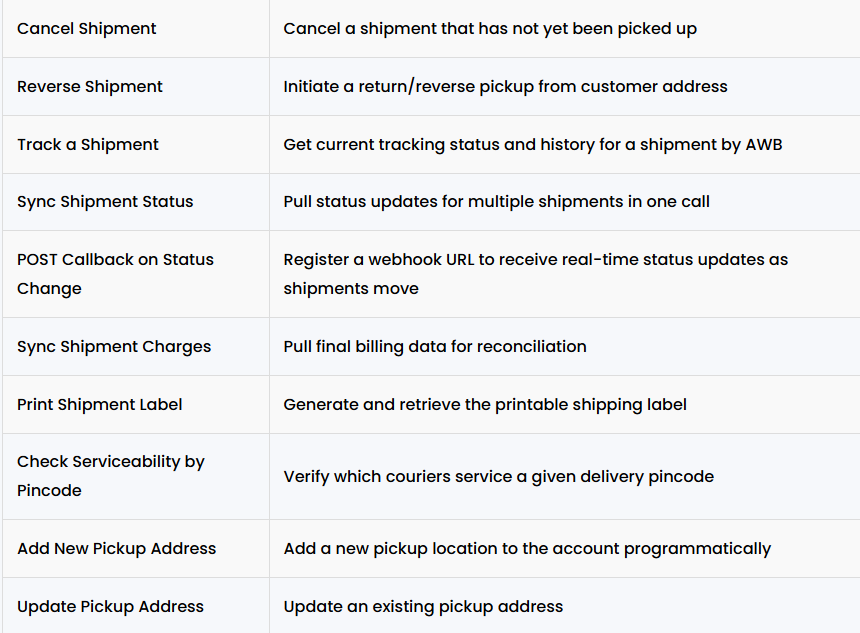
iCarry® provides a full REST API that covers every stage of the shipment lifecycle.
The API supports the following operations:
How to Generate Your iCarry® API Credentials
Before any API call will work, you need to generate your API key. This is a one-time setup:
- Log in to your account
- Go to My Account > API Credentials
- Click the Generate Key button
- Save the key that is displayed - it is shown once
Important: If you see an 'API Not Enabled' error when attempting to book a shipment through your integration, it almost always means this step was not completed. Go to My Account > API Credentials, click Generate Key, save, and retry.
No-Code Platform Integrations
For most eCommerce sellers, the fastest path to automation is through the platform's built-in connectors - which require no API knowledge or coding. These connectors sync orders from your store directly into the dashboard and allow you to book, label, and track from one dashboard.
Shopify Integration
iCarry® offers a Shopify connector that automatically syncs your unfulfilled orders, helping you streamline fulfilment with minimal setup. The entire process takes under 10 minutes:
- Log in to your Shopify admin and go to Apps > Develop Apps > Create an App
- Name the app iCarry.in
- Under Configure Admin API Scopes, enable read-write access for Orders, Customers, and Fulfilments
- Go to the API Credentials tab and copy the Admin API Access Token, API Key, and Secret Key
- In the dashboard, go to Main Menu > API/Integrations > Shopify
- Paste your credentials and enter your Store URL - this is your myshopify.com URL, not your custom domain
- For first-time setup, leave "Sync After Order ID" blank and click Save
Once configured, your Shopify orders will appear in iCarry > My Shipments under Unassigned status within 15 minutes. You can then book shipments individually or use Bulk Book Shipment to process multiple orders at once.
WooCommerce / WordPress Integration
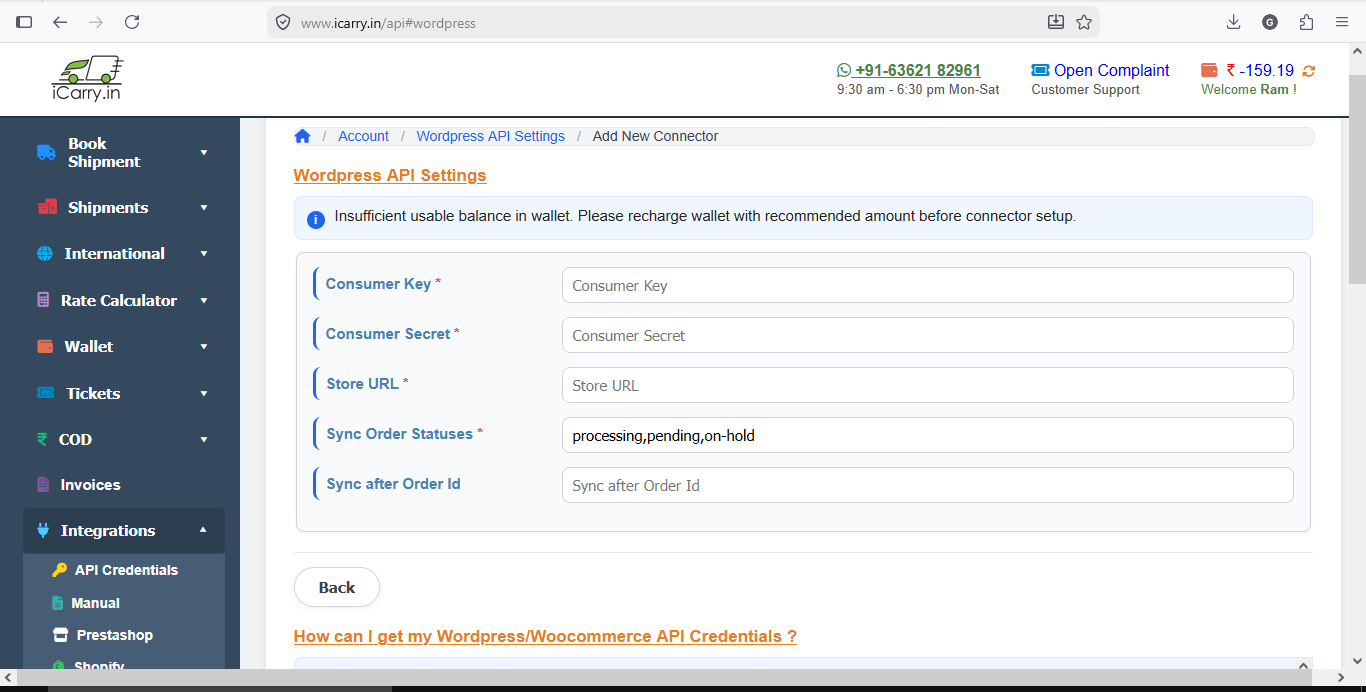
iCarry® connects to WooCommerce without any plugin download - it is a connector-based integration configured entirely from your dashboard:
- Log in to your WordPress admin > WooCommerce > Settings > Advanced > REST API
- Click Add Key and enter the description icarry_private_connector
- Set Permissions to Read/Write and click Generate API Key
- Copy the Consumer Key and Consumer Secret immediately - they are shown only once
- In the iCarry dashboard, go to Main Menu > API/Integrations > WordPress
- Paste Consumer Key, Consumer Secret, and your Store URL (domain only, no https://)
- Leave Sync After Order ID blank for first setup, then Save
After setup: Orders appear in My Shipments within 15 minutes. Fulfilment status syncs back to WooCommerce automatically after booking.
WIX Integration
A WIX connector is available to enable seamless order syncing and fulfilment. You can activate it directly from Main Menu > API/Integrations > Wix in your dashboard. No downloads or manual installation are required.
Zoho Commerce Integration
A Zoho connector is available to enable seamless order syncing. You can set it up by navigating to Main Menu > API/Integrations > Zoho. If you need any assistance during the setup, simply raise a Helpdesk Ticket directly from your dashboard.
Flipkart Integration
iCarry® offers a dedicated Flipkart connector for Self Ship sellers to simplify order processing and shipment management.
The integration can be activated from Main Menu > API/Integrations > Flipkart within your iCarry® dashboard. Once connected, sellers can streamline shipment creation and manage Flipkart Self Ship orders more efficiently through a centralized multi-courier workflow.
Please note: Flipkart Self Shipment approval is required before activating the connector.
Unicommerce Integration
iCarry® offers direct integration with Unicommerce for seamless order and shipment management.
Once your iCarry account is approved and KYC verification is completed, you can connect iCarry directly from your Unicommerce panel in under 2 minutes. The integration helps automate shipment creation, streamline order processing, and simplify multi-courier shipping operations from a single workflow.
OpenCart Extension
A free OpenCart extension is available directly from the API & Extensions section on iCarry®.
The extension supports multiple pickup addresses, automatic shipment booking, real-time shipping cost estimation, order cancellation, label printing, and bulk order sync - helping OpenCart sellers manage shipping operations more efficiently from a single dashboard.
Amazon - Tab Delimited File Upload
iCarry® supports Amazon Self Ship (MFN) orders through a simple bulk upload process.
Sellers can export their Unshipped Orders Report from Amazon Seller Central as a tab-delimited TXT file and upload it directly into the Bulk Upload section on iCarry®.
Once uploaded, iCarry automatically reads the file and creates shipment entries instantly - saving time, reducing manual work, and helping sellers process high volumes faster across multiple courier partners.
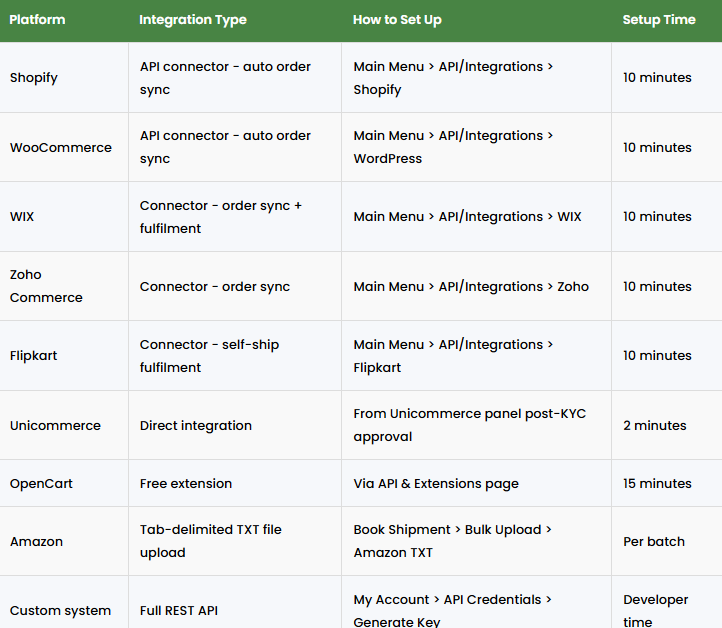
Platform Integration Comparison
Building a Custom Integration with iCarry® REST API
For sellers with a custom OMS, ERP, or proprietary platform, the iCarry® platform provides a full REST API with details openly published on the website. Here is the typical implementation flow:
Step 1: Authentication
Call the Login endpoint with your account credentials to obtain a session token. Include this token in the header of all subsequent API calls.
Step 2: Check Serviceability
Before booking, call the Check Serviceability by Pincode endpoint to confirm which courier partners service the delivery address. This prevents booking failures on unserviceable pincodes.
Example endpoint call:
GET /api/serviceability?pincode=560001Step 3: Get Rate Estimate
Call the Get Estimate endpoint with shipment details - weight, dimensions, origin pincode, destination pincode, and shipment type. The response returns available couriers with their rates and estimated delivery times.
POST /api/estimate
Body: { weight, length, breadth, height, from_pincode, to_pincode, shipment_type }
Step 4: Book the Shipment
Once you have selected a courier, call the Book Shipment endpoint. Pass all order details including consignee name, address, mobile, weight, dimensions, invoice value, and parcel contents. The response returns the AWB number and shipment ID.
POST /api/book_shipmentStep 5: Print the Label
Call the Print Shipment Label endpoint with the shipment ID to retrieve the label as a PDF or HTML. This can be sent directly to your label printer or queued for batch printing.
GET /api/label?shipment_id=XXXXXVideo: How to Print Shipping Labels and Manifests
Step 6: Track and Receive Webhooks
Use the POST Callback on Status Change endpoint to register a webhook URL. The platform will push tracking updates to your URL in real time whenever a shipment status changes - picked, in transit, out for delivery, delivered, NDR, or returned.
POST /api/register_webhook
Body: { callback_url: "https://yourdomain.com/webhook/icarry" }
This eliminates the need for polling - your system is notified instantly rather than checking for updates on a schedule.
Handling Status Updates and NDR via Webhook
The webhook integration is where courier API connectivity becomes truly powerful for operations. When a shipment hits an NDR status, your system can:
- Trigger an automatic customer notification via WhatsApp or SMS
- Create an internal support ticket for the operations team
- Update the order status in your OMS
- Queue a reattempt instruction back via the platform API
Building this kind of automated NDR response loop - where the system detects a failed delivery and immediately takes action - is what separates sellers with 5% RTO from those absorbing 25%. Using NDR data to improve delivery success rates explains the underlying patterns and decisions this kind of automation should encode.
Weight Discrepancy Management via API
iCarry®'s API includes a Sync Shipment Charges endpoint that pulls final billing data - including any weight discrepancy adjustments - for reconciliation in your system. When discrepancies are raised, your system can:
- Match the revised charge against the original booking data
- Automatically flag discrepancies above a threshold for review
- Trigger dispute submission if pre-uploaded product images are on file
Understanding how weight discrepancy charges accumulate and how to dispute them gives the operational context for building this logic into your integration.
Using the iCarry® API for Rate Comparison and Cost Optimisation
The Get Estimate endpoint returns rates from all available courier partners in a single call. A well-built integration uses this to implement intelligent routing rules:
- For COD orders to Zone D pincodes: select the courier with the lowest RTO rate in that zone
- For high-value prepaid orders: select Blue Dart regardless of cost
- For lightweight metro orders: select the lowest-rate option since delivery risk is minimal
- For Tier-2 and Tier-3 COD orders: prioritise first-attempt success rate over price
This kind of rule-based routing - built into your integration rather than requiring manual decisions - is what makes shipping cost reduction sustainable at scale. The routing logic runs on every order automatically without your team ever touching the decision.
Analytics and Reporting Through the API
The Sync Shipment Status and Sync Shipment Charges endpoints, combined with webhook data, give your analytics system a complete picture of logistics performance - delivery rates, RTO rates, transit times, and cost per order - all feeding into eCommerce analytics dashboards that drive business decisions.
Sellers who instrument their API integration well end up with logistics data that answers questions like:
- Which courier has the highest first-attempt success rate for Zone D COD orders in Q3?
- What is my average cost per delivered order by product category?
- Which pincodes generate the most weight discrepancy charges?
- How does RTO rate correlate with dispatch-to-pickup time?
Common Integration Issues and How to Fix Them
S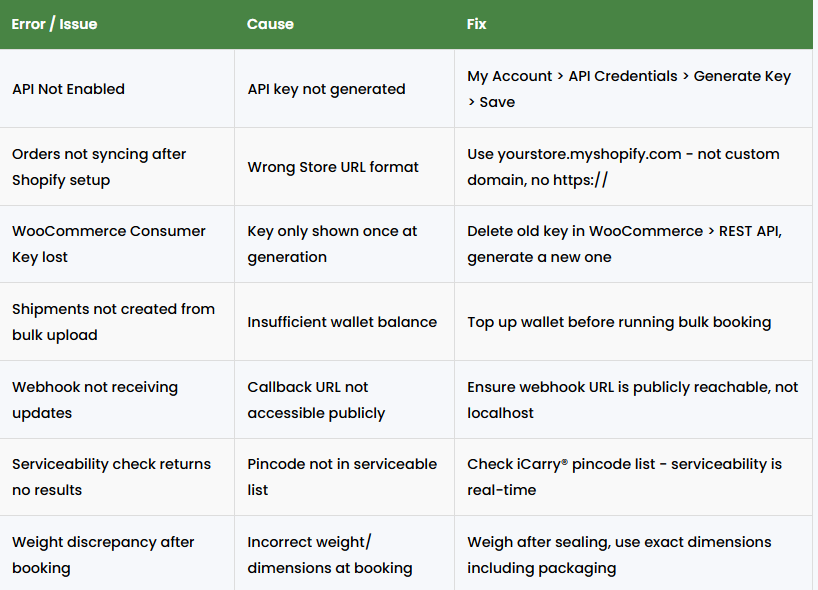
Security Best Practices for Courier API Integration
- Store credentials securely: Never hardcode API keys in frontend code or public repositories. Use environment variables or a secrets manager
- Use HTTPS for all calls: All API communication should be over HTTPS. Never call courier APIs over HTTP
- Validate webhook signatures: If your courier API provides webhook signatures, verify them before processing the payload to prevent spoofed callbacks
- Rate limit your calls: Avoid hammering the estimate endpoint. Cache rate responses for identical shipment profiles for a few minutes rather than calling per order
- Handle errors gracefully: Build retry logic for transient failures and alert your team for persistent errors - a silent booking failure means an unshipped order
Monitoring Your Integration Performance
A courier API integration is not a set-and-forget system. Monitor these metrics regularly:
- Booking success rate - what percentage of API booking calls complete successfully?
- Label generation time - are labels ready before the courier arrives for pickup?
- Webhook delivery rate - are all status updates reaching your system?
- Shipment charge sync accuracy - do API charges match actual courier invoices?
- Delivery performance by courier - which couriers accessed through the API are performing best? Logistics KPIs to track for eCommerce operations gives the full monitoring framework
Benefits of Courier API Integration for Indian eCommerce
Zero manual data entry: Order details flow from your store to the courier automatically - no copying, no pasting, no transcription errors.
Faster dispatch: Automated booking means shipments are ready within minutes of order placement, not hours. This is the difference between meeting SLA and missing it at scale.
Real-time visibility: Tracking data flows back into your system automatically. Your team and your customers always know where every shipment is.
Scalability: Your logistics operation scales with your order volume without proportional headcount increases. The API handles 10 orders the same way it handles 10,000.
Cost optimisation: Rate comparison across multiple couriers happens automatically per order. No rate-shopping required - the integration does it.
Final Thoughts
Courier API integration is the foundation of a scalable eCommerce logistics operation in India. Whether you use iCarry®'s no-code connectors for Shopify and WooCommerce, the tab-delimited file upload for Amazon, or build a full REST API integration for a custom platform - the outcome is the same: your team stops entering data and starts managing exceptions.
For Indian sellers processing meaningful order volumes, the question is not whether to integrate - it is which path to integration is fastest for your current tech stack. The platform's connectors give most sellers a working automated integration in under 15 minutes without writing a single line of code.
Generate your API key and explore iCarry®'s integrations at iCarry.in. New to iCarry®? Register free - no minimum volume, no monthly fee.
Video: How to Sign Up and Activate Your Account
Frequently Asked Questions (FAQs)
What is courier API integration?
It is the process of connecting your eCommerce store, OMS, or custom website or order management system to a courier or courier aggregator's system programmatically - so shipments are booked, tracked, and managed automatically without manual data entry.
Does iCarry® charge extra for API access ?
No. The API is available to all account holders at no additional cost. Shipment charges remain the same whether booked through the API, the dashboard, or a platform connector.
How do I enable API access ?
Go to My Account > API Credentials in the dashboard and click Generate Key. This is a one-time step required before any API call or connector will work.
Which eCommerce platforms does iCarry® integrate with?
Shopify, WooCommerce, WIX, Zoho Commerce, Flipkart, Unicommerce, OpenCart, and Prestashop. Amazon is supported through tab-delimited TXT file upload. Any custom platform can integrate through the full REST API.
How long does Shopify or WooCommerce integration take to set up?
Under 10 minutes for most sellers. Orders appear in the dashboard within 15 minutes of saving the connector settings.
What happens if I get an 'API Not Enabled' error?
Go to My Account > API Credentials and click Generate Key. Save the key. This one-time action activates API functionality for your account and resolves the error immediately.
Can I use iCarry®'s API to compare courier rates automatically?
Yes. The Get Estimate endpoint returns rates from all available courier partners for any given shipment profile - weight, dimensions, origin pincode, and destination pincode - in a single call. Your system can use this to implement automatic courier selection logic.
Can I receive real-time tracking updates through the API?
Yes. Register a webhook URL using the POST Callback on Status Change endpoint. The platform pushes shipment status updates to your URL in real time whenever a shipment milestone occurs - pickup, in transit, out for delivery, delivered, NDR, or returned.
Does the API support international shipments?
Yes. The Get Estimate - International and Book Shipment - International endpoints support India-to-international shipments via FedEx and Aramex. International account approval and KYC are required before these endpoints are accessible.
Courier API integration is the foundation of a scalable eCommerce logistics operation in India. Whether you use no-code connectors for Shopify and WooCommerce or build a full REST API integration for a custom platform - the outcome is the same: your team stops entering data and starts managing exceptions. The platform's connectors give most sellers a working automated integration in under 15 minutes without writing a single line of code.